Photo by Laura Harris Photography
So you selected your favorite design and you figured out how to word your invitations, now you have multiple boxes of cards and oodles of envelopes sitting on your dining room table and you’re like “How the heck am I supposed to put these things together?”. Let’s start with the basics:
Basic Assembly –
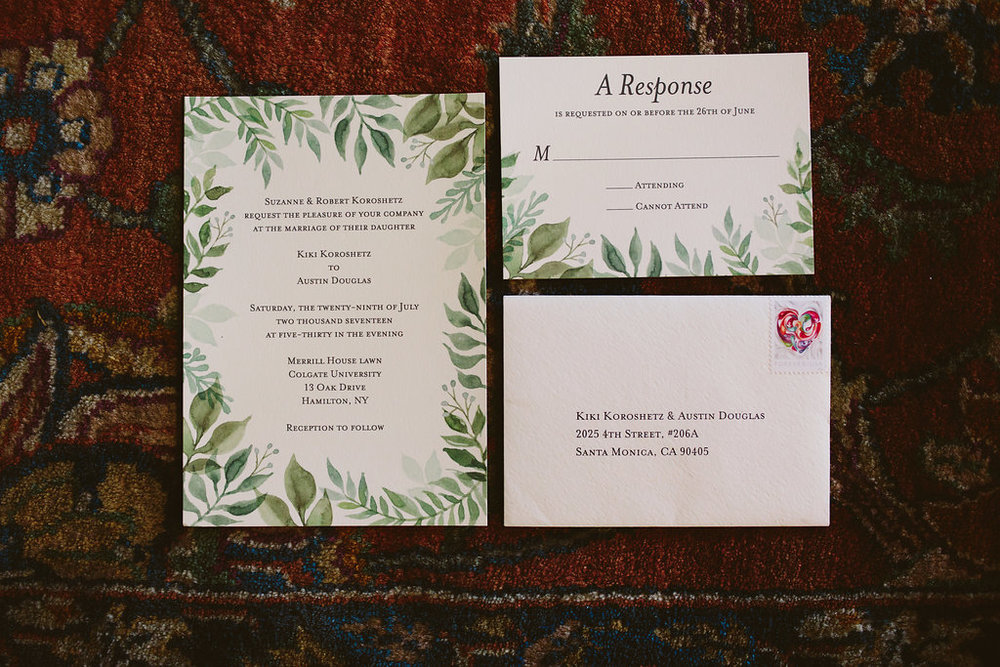
While some people can get a little crazy with the number of enclosures they include in their invitation suite, the very basic set up is going to consist of the main invitation card and a response (or RSVP) card. Maybe your response card is a post card. Maybe it is a card without envelope that tells your guests how to e-RSVP. All of these situations are possible but to make things easy here I am going to assume you are working with a standard response card with an envelope that your guest is going to fill in and pop in the mail to send back to you. In this scenario you are going to want to stamp your response card envelopes, make sure the address to where they need to come back to is listed on the envelope, and then you are going to flip that envelope over and lay the response card face up on the back of the envelope with the envelope flap sitting on top of the card (you are not placing the response card inside the response card envelope, you are just laying the flap of the envelope over the top of the card). Then you are going to take your main envelope, insert the main invitation face up so guests will see the text when they open the envelope, then you will take the response card tucked in with the RSVP envelope, and place those in the main envelope on top of the main invitation with the response card text and RSVP envelope flap facing up. Press that response card and RSVP envelope down to the bottom of the main invitation so that it is secure and won’t jiggle around during mailing. Then seal the main envelope, add the appropriate stamp to cover the weight of the invitation suite, and pop that baby in the mail.
Assembly with Multiple Enclosures –
If you have a response card and a reception card and a card to list your website and gift registries you could be looking at this pile of pretty paper and feel pretty confused about what is supposed to go together with what. You should start with the basic assembly that is listed above to get your main invitation inside the envelope with the response card sitting face up with the response card enveloped flap laying over the top. The rest of your enclosure cards will be inserted into the main envelope facing up and positioned one on top of the other in order of size. So if you have a reception card that is larger than the response card and envelope that will go behind with the response card sitting on top. If you have a smaller card to show where you are registered for gifts that would go on top of the response card. All of your enclosure cards will end up being stacked on each other according to size, and all should be secured in the envelope by pressing them down towards the bottom. And although it is hardly ever seen anymore you may get tissue paper back from your invitation printer and wonder what you are supposed to do with that. It is unlikely that modern print techniques are going to cause ink to smudge onto the other cards, but if you get tissue paper and want to use it this would be placed as a single layer directly on top of the main invitation card, fitting between the main invitation and all of the enclosure cards. Modern couples often throw out all the etiquette rules on what is proper or not proper to throw into an invitation suite. Just keep in mind that the more things that go in the heavier the mailing will become, meaning more costs for postage.
Assembly with Multiple Envelopes –
Finally you may get your invitations from your printer and find that there is a double set of large mailing envelopes. This is not a mistake! If you look closely you will find that one style is slightly bigger than the other (and the slightly smaller one may also not have adhesive on the envelope flap). These envelopes are the outer envelope (the slightly bigger one) and the inner envelope (the slightly smaller one). While you definitely need to use the outer envelope you may choose whether or not to use the inner one. The reason for having two is to allow for your guests to keep a completely pristine set of your invitations without any markings or scuffing from the postal service. In this way a guest could discard the worn outer envelope and still be able to keep an organized set of your invitation suite by keeping everything enclosed in the inner envelope. If you choose to use both you will follow the assembly instructions listed above but you will be placing your main invitation and all of your enclosures inside the inner envelope, then putting that into the outer envelope. When you insert the inner envelope it should be turned around so that when your guests open the outer envelope they will see either their names printed on the inner envelope or they will see the blank front of the second envelope.
Remember to take a fully stuffed invitation suite to the post office to have it weighed before you purchase and stamp the outer envelopes. There would be nothing worse than to spend all the time and card to assemble your invitations properly only for every single one to be returned back to you with insufficient postage!
Check out some of our related posts to for more Pro Tips!
Invitation Wording – Traditional Etiquette and Modern Interpretation

")


comments +